How do I set up inventory items, non-inventory items and services?
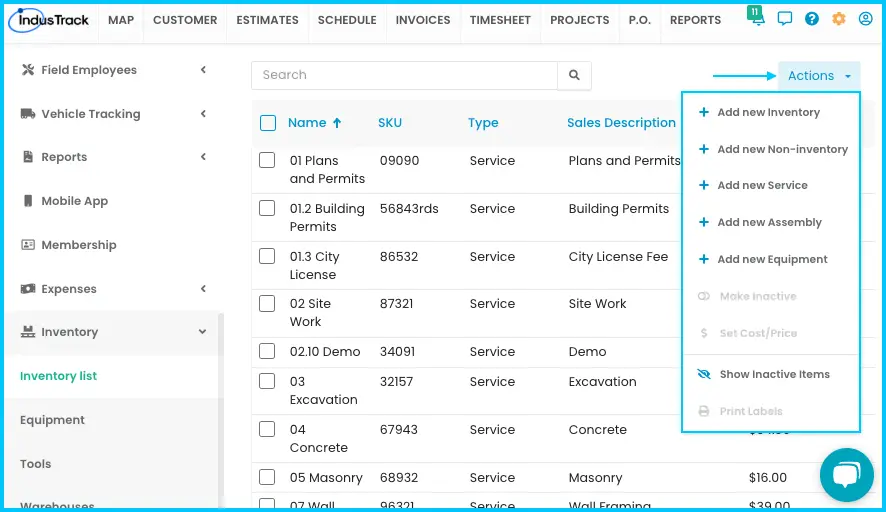
Go to Settings›Inventory›Inventory List, click Actions and choose + Add New Inventory, + Add New Non-inventory or + Add New Service. Fill in the form and click Save. You can also sync items from QuickBooks.
Which item type do I need?
| Type | Use it for |
|---|---|
| Inventory item | Products you buy to resell or bill to customers, and track in stock. |
| Non-inventory item | Products you buy for internal use or for a specific job, such as custom materials you don't stock or resell regularly. Materials you don't need to track closely. |
| Service | Work you offer customers, such as maintenance, repairs, engineering or transport. |
| Assembly | A mix of inventory items, non-inventory items and services. See How do I build assemblies? |
| Equipment | Machines or tools used on the job. See How do I track equipment and tools? |
Setting up items lets you use them on estimates and invoices. You can enter items by hand, sync them from QuickBooks (see How do I connect QuickBooks Online? or How do I connect QuickBooks Desktop?), or send them in our spreadsheet templates and have the IndusTrack team import them (see How do I get my data into IndusTrack?).
Add an inventory item
-
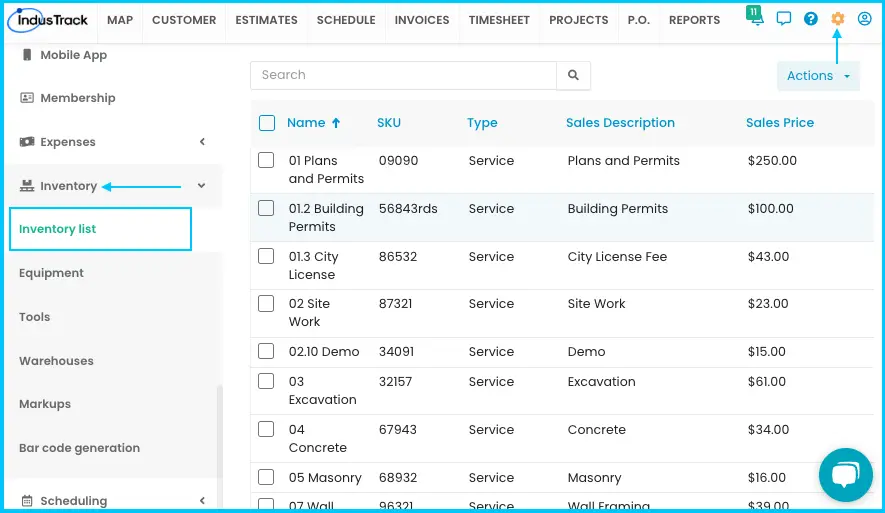
Go to Settings›Inventory›Inventory List.
-
Click Actions›+ Add New Inventory.
Watch: Opening the form to add a new inventory item -
Fill in the general details:
- Name (required)
- SKU: the product code.
- Vendor: pick a supplier, or type a new name to add it.
- Non-taxable: check if the item isn't taxable.
Watch: Entering an inventory item's name, SKU, vendor and Non-taxable setting - Income Account: pick or search for the income account. If it isn't listed, type it; it's added when you save.
- Sales Price / Rate: the selling price per unit.
- Sales Description (optional): a short description.
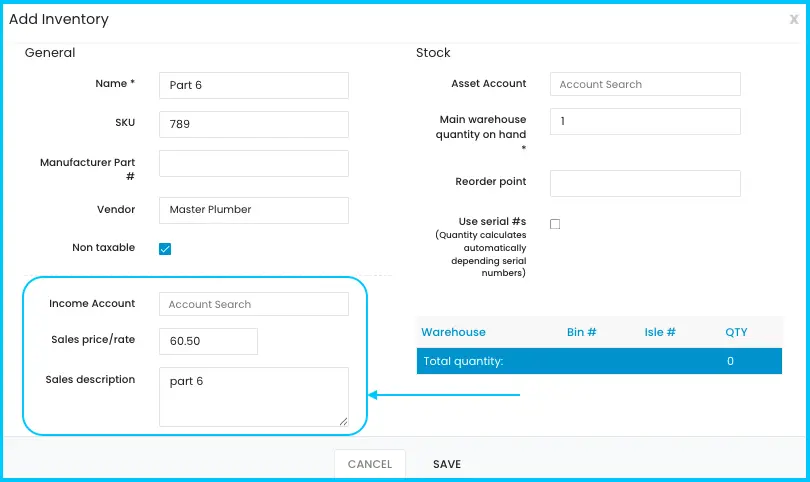
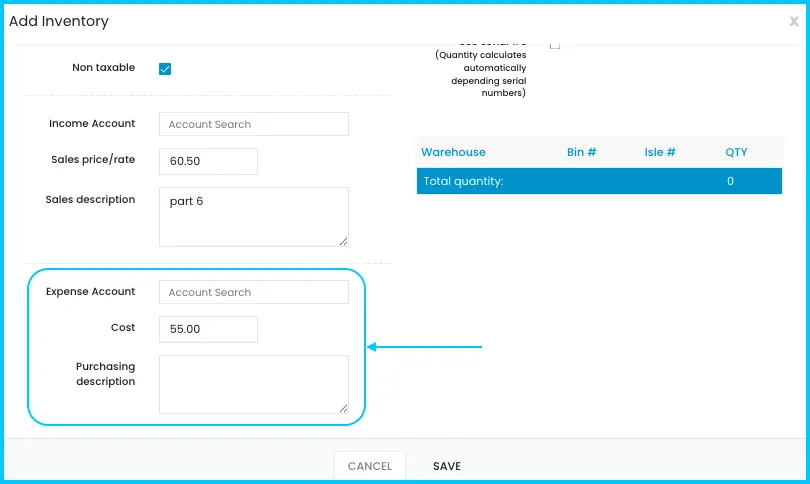
- Expense Account: pick, search or type the expense account.
- Cost: the cost per unit.
- Purchasing Description: notes such as lead time or special instructions.
-
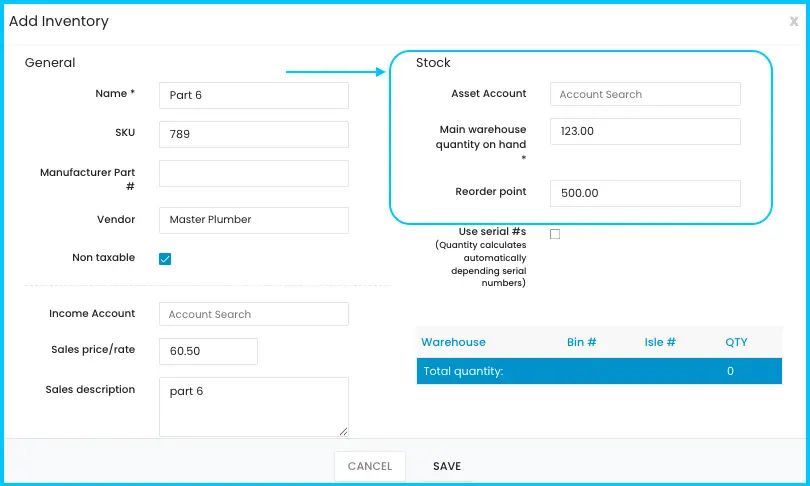
Fill in the stock details:
- Asset Account: pick or search for the asset account.
- Main Warehouse Quantity on Hand (required): current stock. Type 0 if you have none.
- Reorder Point: the minimum stock before you restock.
-
To track the item by serial number (optional):
- Check Use Serial #s and click OK to confirm. Leave it unchecked if you don't use serial numbers.
- On the Serials tab, click Enter New Serial Batch.
- Enter the expiration date and serial number(s). Enter each batch separately.
- Click Proceed.
Watch: Turning on serial numbers and entering a serial batch -
Click Save. The item is added to the Inventory List.
-
Once you know where the item is stored, open it again and enter the Bin # and Isle #.
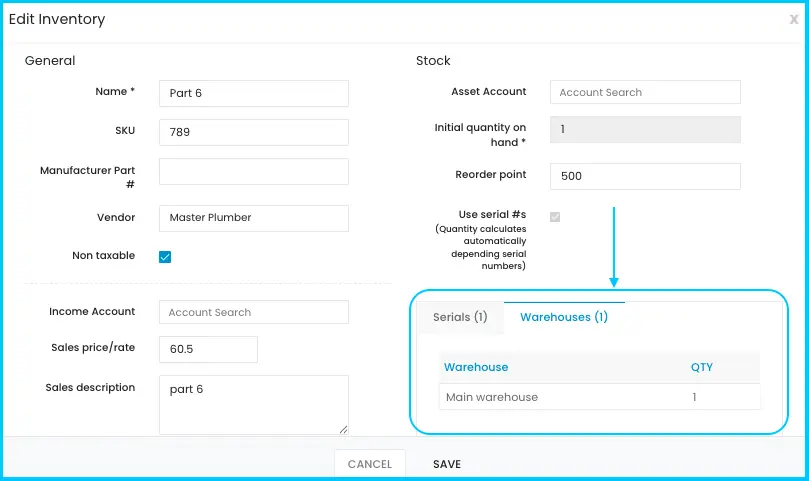
With serial numbers on, stock levels show on the item's Warehouses tab after saving, and the quantity field reads Initial Quantity on Hand instead of Main Warehouse Quantity on Hand.
Add a non-inventory item
-
Go to Settings›Inventory›Inventory List.
-
Click Actions›+ Add New Non-inventory.
Watch: Opening the form to add a new non-inventory item -
Fill in the details:
- Name (required)
- SKU, Vendor (pick or type a new one) and Non-Taxable
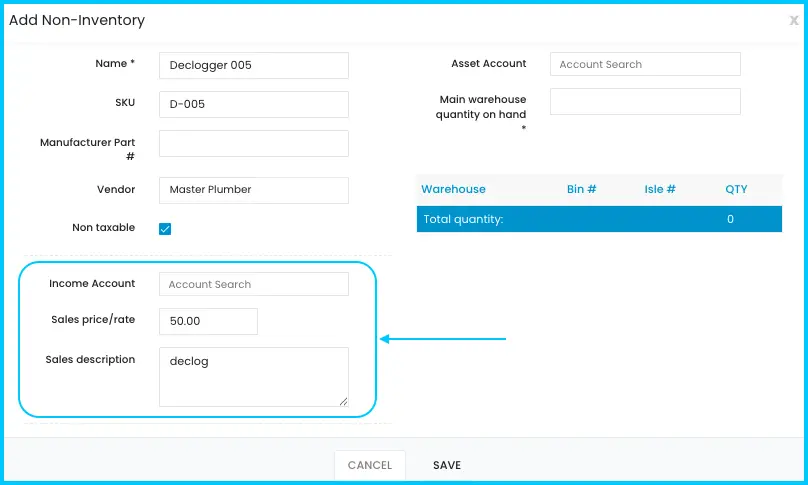
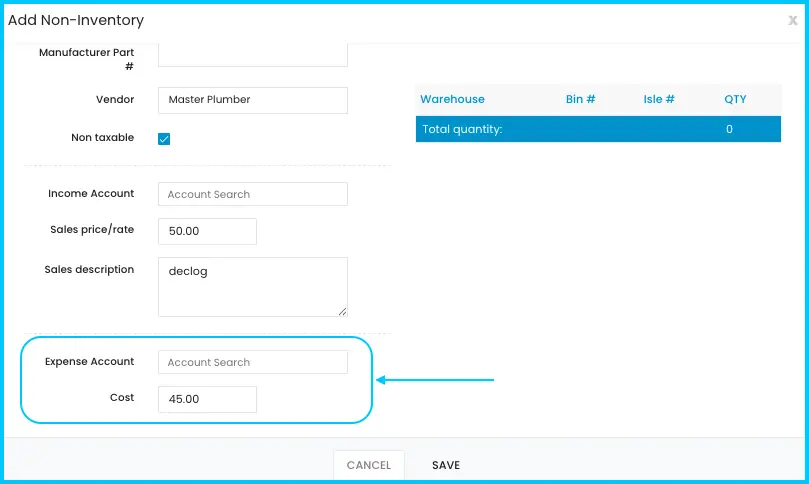
Watch: Entering a non-inventory item's name, SKU, vendor and Non-Taxable setting - Income Account and Expense Account: pick, search or type.
- Sales Price / Rate (if it applies) and Sales Description: include how or where the item is used.
- Cost: the most recent purchase cost.
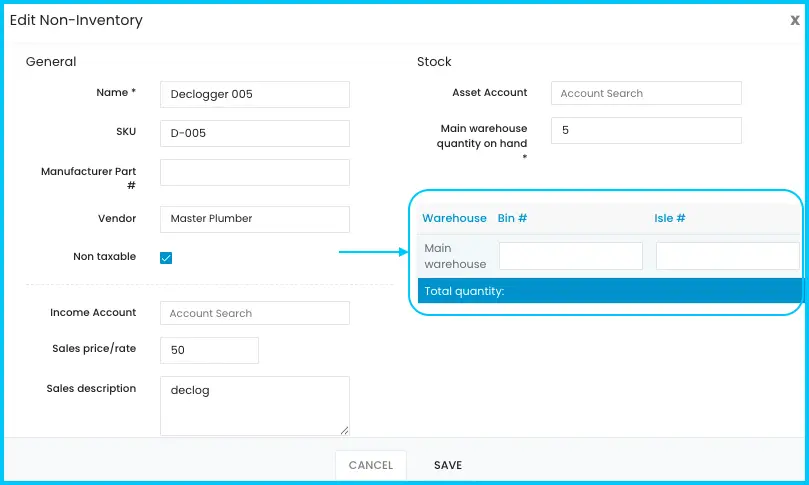
- Main Warehouse Quantity On Hand (required): the starting quantity. Use 0 if there's none.
Watch: Entering the starting quantity and saving the non-inventory item -
Click Save.
-
Optional: open the item again to add Bin # and Isle #, so you know where it's kept.
Add a service
-
Go to Settings›Inventory›Inventory List.
-
Click Actions›+ Add New Service.
Watch: Opening the form to add a new service -
Fill in the details:
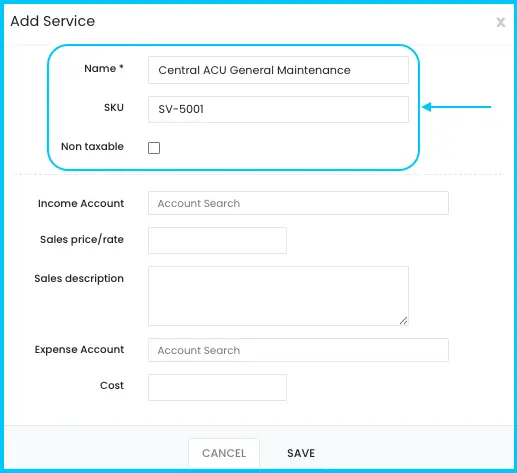
- Name (required)
- SKU: the service code.
- Non-Taxable: check if the service isn't taxed.
- Income Account: where sales revenue goes. Pick, search or type it.
- Sales Price/Rate: what you charge.
- Sales Description: a short description.
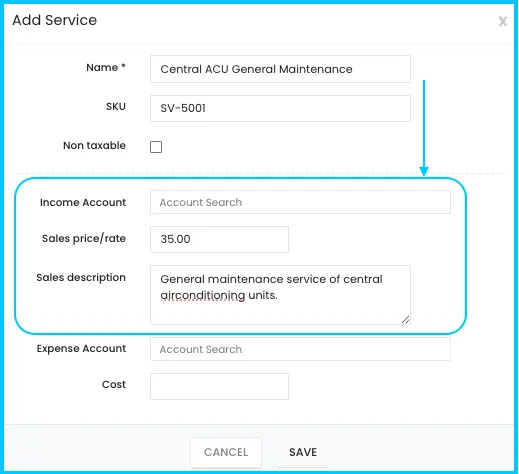
- Expense Account: where the service cost is tracked.
- Cost: what it costs you to provide the service.
Watch: Entering the expense account and cost, then saving the service -
Click Save.
Edit an item
-
In the Inventory List, click the item.
-
Make your changes and click Save.
Watch: Editing an item in the Inventory List
You need edit permission to change items. Inactive items can't be edited; reactivate them first.
Deactivate, reactivate or delete items
These steps are the same for inventory items, non-inventory items and services.
-
Deactivate: in the Inventory List, check the item or items (or the checkbox in the Name header for all), click Actions›Make Inactive and click Yes. The items move to the inactive list. Deactivate rather than delete if the item was used before.
Watch: Making one or more items inactive -
See inactive items: click Actions›Show Inactive. Click Actions›Show Active to go back.
Watch: Switching between the active and inactive lists 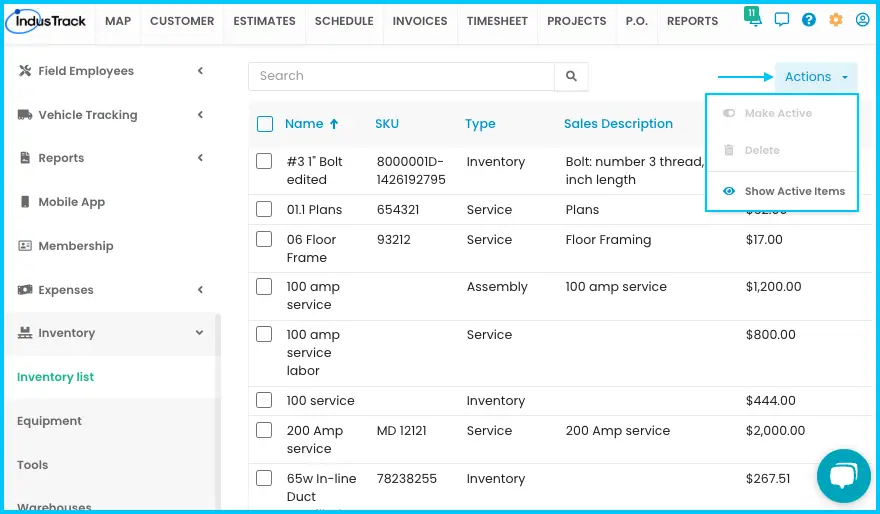
-
Reactivate: in the inactive list, check the items, click Actions›Make Active and click Yes.
Watch: Making an inactive item active again -
Delete: only inactive items can be deleted. In the inactive list, check the items, click Actions›Delete and click Yes. Deleting is permanent and can affect past data and reports.
Watch: Deleting an inactive item
The Inventory List
The list shows your active inventory items, non-inventory items, services and assemblies. Search by name or SKU, click a column header to sort, and choose 10, 25, 50 or 100 items per page.
| Column | What it shows |
|---|---|
| Name | The item name. |
| SKU | The item code. |
| Type | Inventory, Non-inventory, Service or Assembly. |
| Sales Description | A short description. |
| Sales Price | What you sell it for. |
| Cost | What it costs you. |
| Qty on Hand | Stock on hand (not shown for services or assemblies). |
| Bar/QR Code | A checkmark means the item has a barcode or QR code. |
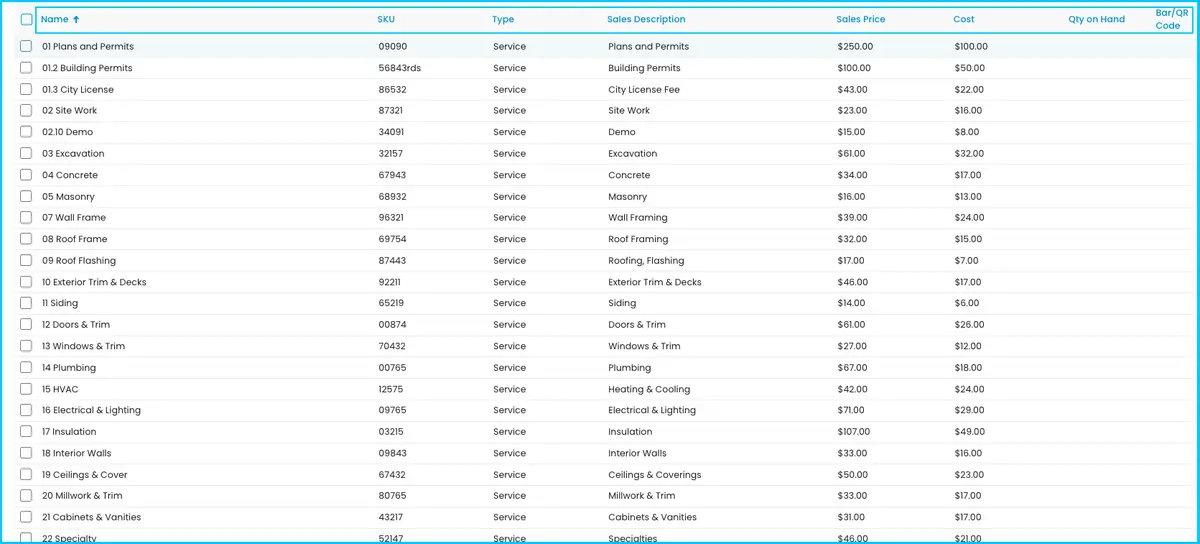
The Actions menu on the active list also lets you create equipment, Set Cost/Price for several items at once, and Print Labels (see How do I print barcodes?).
Set the cost and price of several items at once
- In the Inventory List, check the items you want to update.
- Click Actions and select Set Cost/Price.
- Enter the cost and price.
- Click Set.
Add items to a pricebook
The PriceBooks feature must be turned on first.
- Go to Settings›PriceBooks›Flat Rate Pricebook.
- Add the items from your Inventory List.
- Assign them to the right pricebook category.
See How do I set up my pricebook?
Common questions
What happens if I add an item with a name that already exists?
A message asks whether to continue. Yes creates a second item with the same name, which can be confusing. No cancels.
Who can add and change items?
Office users, depending on their inventory permission: No Access, View Only or Edit Access.
Where else can I manage inventory?
Settings›Inventory also has Equipment, Tools, Warehouses, Markups and Barcode Generation. Vehicles work as sub-locations for inventory; see How do I manage warehouses and stock?
Was this article helpful?
Contact support