How do I create and schedule a job?
In the Schedule module, double-click an employee's time slot to create a job for them, or click Actions›Add Unassigned Job if you don't know who or when yet. Fill in the job, then click Save, or Dispatch Now to send it to the tech's mobile app.
Three ways to start a job
| If you… | Do this |
|---|---|
| Know who and when | In the Timeline View, double-click under the employee at the time slot. The employee, date and time are filled in for you. |
| Don't know who or when yet | Click Actions›Add Unassigned Job (works from any calendar view). The job waits in the Unassigned Jobs queue. |
| Have an estimate | In the Estimates module, click the three dots on the estimate and choose Convert to Job. The job description fills in from the estimate. |
Steps
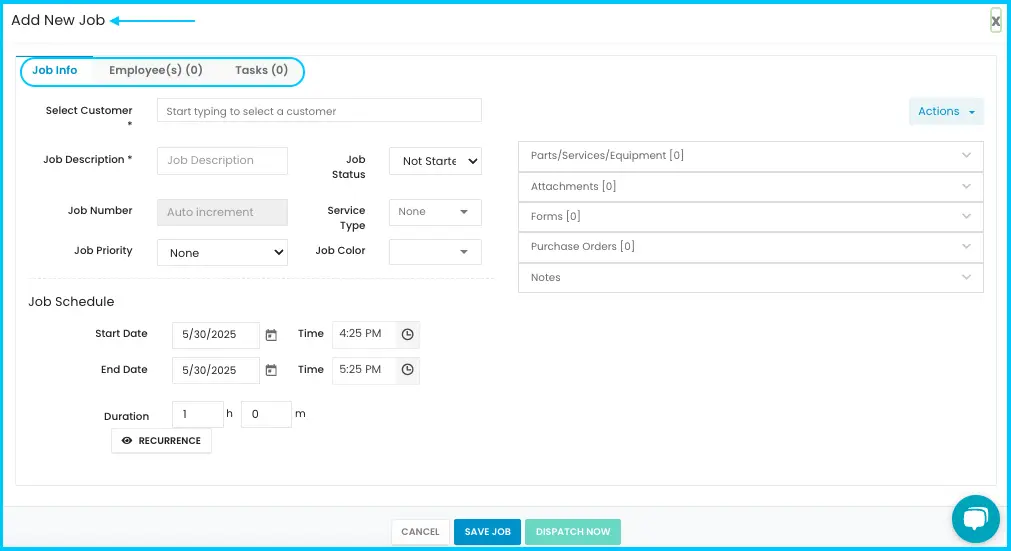
The Add New Job window has three tabs: Job Info, Employees and Tasks.
-
Job Info: customer. Start typing the customer's name and pick them from the list. Their contact details, billing and service address, tags and pinned site notes appear. You can also view their existing jobs and estimates.
- Customer not listed? Scroll to the bottom of the list and click Create a New Customer. This takes you to the Customer module to add them first.
- If the customer has several service addresses, a Service Location field appears. Choose one, or leave it blank to use the main address.
Watch: Selecting the customer and service location for a job -
Job Info: details.
- Job Description: a short description; it shows on the calendar.
- Job Number: filled in automatically if numbering is set up. Otherwise, type it in.
- Service Type and Job Color: pick from the lists set up in scheduling settings.
- Job Status: Not Started, Started, Paused, Complete or Declined. Statuses update automatically as techs work in the app.
- Priority: Low, Medium or High.
Watch: Adding the job description, number, service type, color and schedule Watch: Setting the job status and priority -
Job Info: schedule. Set the start and end date and time, or a start and an estimated duration (the end time fills in). Times are for planning only; the tech's actual time is recorded in the field. Leave date and time blank to put the job in the Unassigned Jobs queue.
-
Job Info: repeating jobs (optional). Check Recurrence and choose Daily (every day, weekday or custom), Weekly (days and interval), Monthly or Yearly (a day or date, and interval). End it on a date or after a number of occurrences. For a job that runs over several days, use Enable Multiday and set the start time, end time and total duration.
Watch: Filling in the job details and setting up a multiday or repeating job -
Job Info: extras (optional).
- Parts, services or equipment from inventory, or the customer's existing equipment. Techs can also add parts later.
- Attachments: URLs, files from the customer's profile, files from your computer, or Tools the crew will need.
- Forms the tech or customer fills in, with a trigger for when each form appears.
- Purchase Orders: create a PO for parts and link it to the job.
- Notes: Office notes are instructions the tech sees once dispatched. Field notes are added by techs and seen by the office after sync. Site notes are saved to the customer's location (gate codes, access).
Watch: Adding parts, equipment, attachments, forms and purchase orders to a job 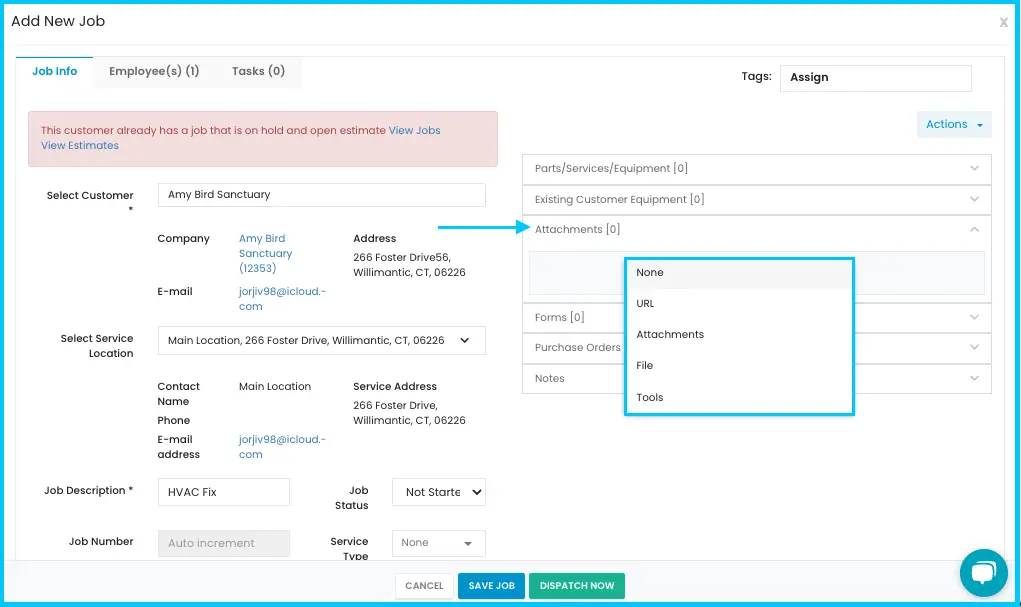
-
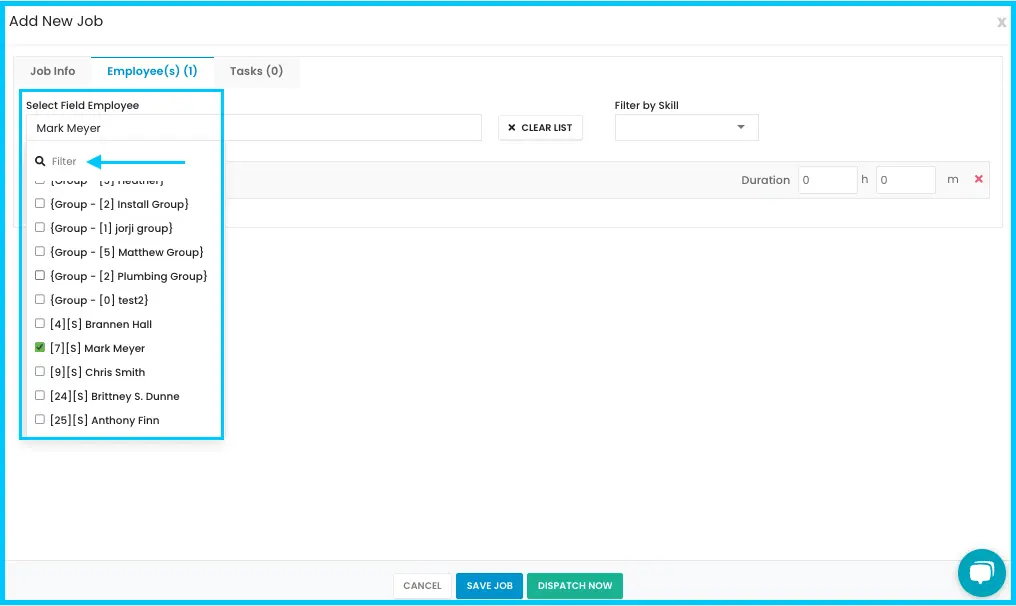
Employees tab. Click Select Employee and check each employee or group; a group adds each of its members. Click outside the list to close it. Remove one person with the X, or everyone with Clear List. Leave it empty if you don't know who yet; the job goes to Unassigned Jobs.
Watch: Adding and removing employees on a job -
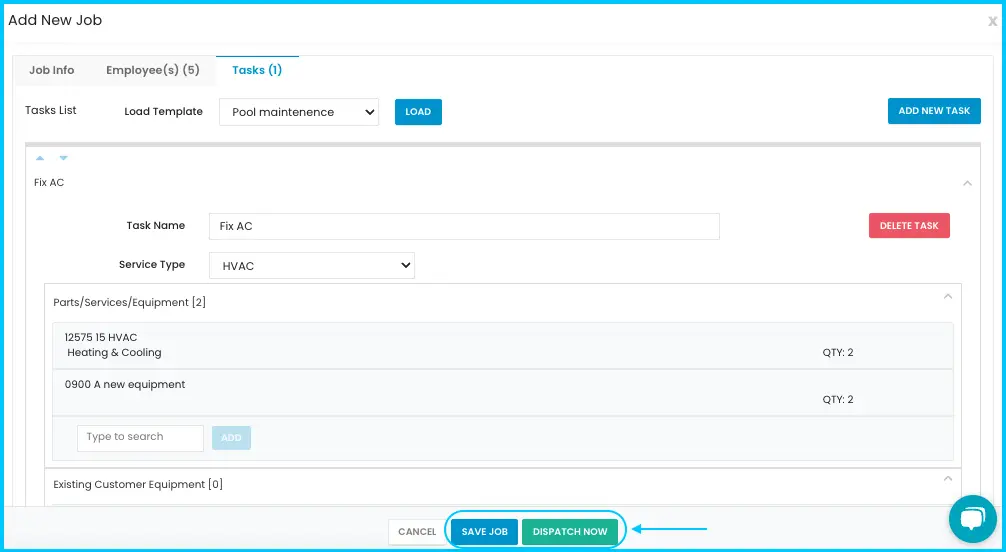
Tasks tab (optional). Click Load Template to load a saved task template, or Add New Task to add one by hand: task name (defaults to the job description), service type, office notes (saved to the Notes tab of the customer's profile when the job is saved), parts and services, equipment, attachments and forms. To remove a task, open it and click Delete Task.
Watch: Loading a task template onto a job Watch: Adding a new task and deleting a task -
Click Save to put the job on the calendar without notifying anyone, or Dispatch Now to save it and send it to the assigned techs' mobile app.
Once dispatched, techs get a notification in the app for the new job and for any later changes. What they do next is covered in How do techs work jobs in the app?
Common questions
How do I make a recurring job, and why is the option greyed out?
Check Recurrence on the Job Info tab. It's only available when the job's status is Not Started. If you just changed the status to Not Started, save the job first, then set the recurrence.
I'm entering a job that's already done so I can invoice it. What status should I use?
Set the status to Complete. Completed jobs can be turned into invoices.
Why can't I see some employees when assigning a job?
You're on a custom calendar, which only shows the employees and groups linked to it. The Default Calendar includes all field employees.
Is there a limit on tasks?
Yes, 30 tasks per job. Loading a task template replaces any tasks already on the job, and only one template can be loaded per job. You can add tasks by hand afterwards.
Another user and I edited the same job, and my changes weren't saved. Why?
Whoever saves first wins. You'll see "Job could not be saved. You and another user were working on this at the same time." Refresh the job to load the latest version, then make your changes again.
What's the difference between job-level and task-level form triggers?
A trigger added to the job applies to the whole job; one added to a task applies only to that task. Triggers must be created by an office user to work.
Was this article helpful?
Contact support