How do I add or edit a customer?
Go to the Customer module and click + Add New (or More Actions›Add New Customer), fill in the General and Tax & Payment Terms tabs, and click Save. To edit a customer, open their profile and click Edit Contact.
Ways to add customers
| Method | When to use it |
|---|---|
| Add manually | One customer at a time, in the Customer module (steps below). |
| Sync from QuickBooks | If QuickBooks is connected, customers you add in QuickBooks appear in IndusTrack automatically. See How do I connect QuickBooks Online? or How do I connect QuickBooks Desktop? |
| Import from Excel | Moving from another system. Send your customer list in our spreadsheet template and the IndusTrack team imports it for you. See How do I get my data into IndusTrack? |
Add a customer
-
Search the customer list first to make sure the customer isn't already there.
-
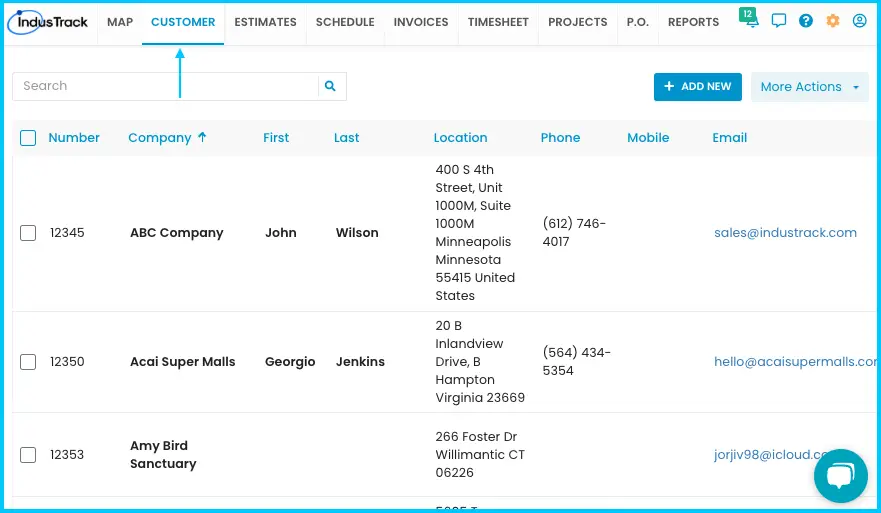
Click Customer in the top menu.
- If it's greyed out or missing, you don't have access to this module. Ask your admin.
-
Click + Add New, or More Actions›Add New Customer.
Watch: Opening the new customer form -
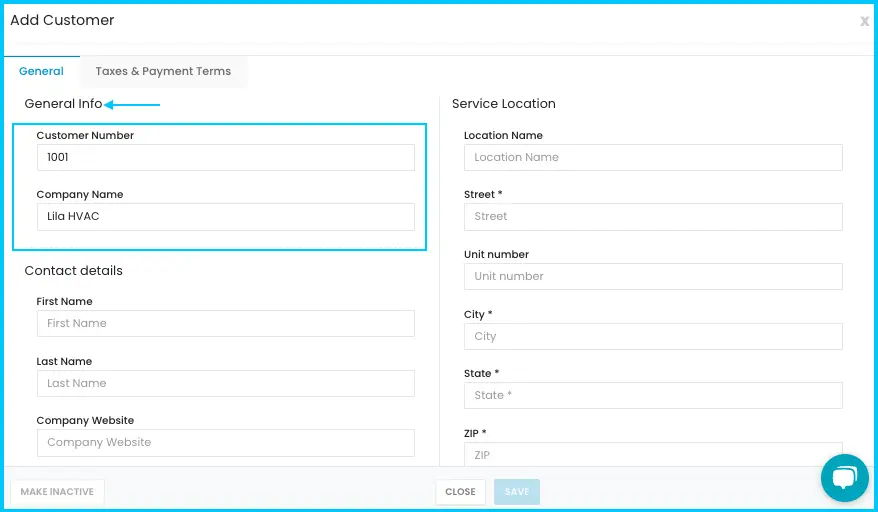
On the General tab, fill in:
- Customer Number: filled in for you if auto-numbering is on; otherwise type it.
- Company Name: for a person rather than a business, use their full name.
- Contact details: the contact's first and last name, email, phone and mobile. To save more than one email, separate them with commas, semicolons or spaces.
- Website: the company's website.
- Service Contract: click Choose File to upload the agreement.
Watch: Saving more than one email for a customer 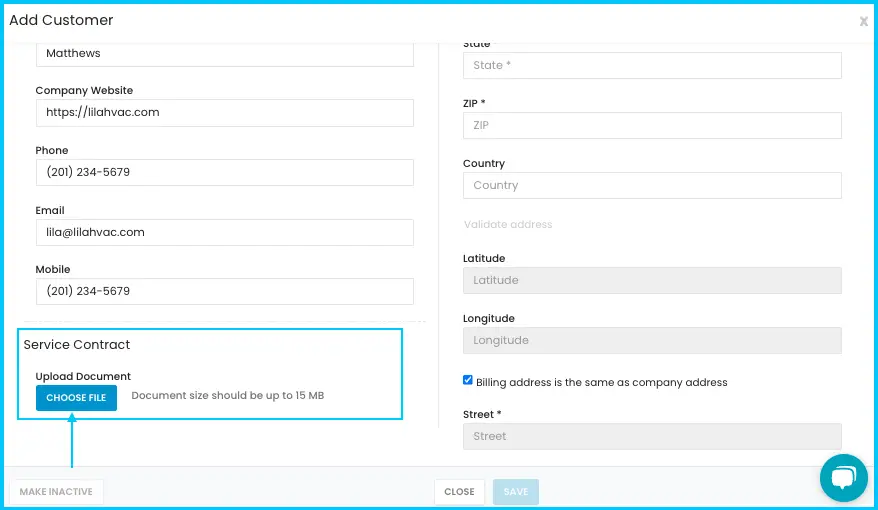
-
Fill in the Service Location:
- Location Name: the building or site name.
- Street (required), Unit Number, City (required), State (required), ZIP (required), Country.
- To add more service locations, edit the profile after saving.
- Click Validate Address to show it on the map. Latitude and longitude fill in automatically.
-
Fill in the Billing Address, or check the box if it's the same as the service address.
Watch: Filling in the service location and billing address -
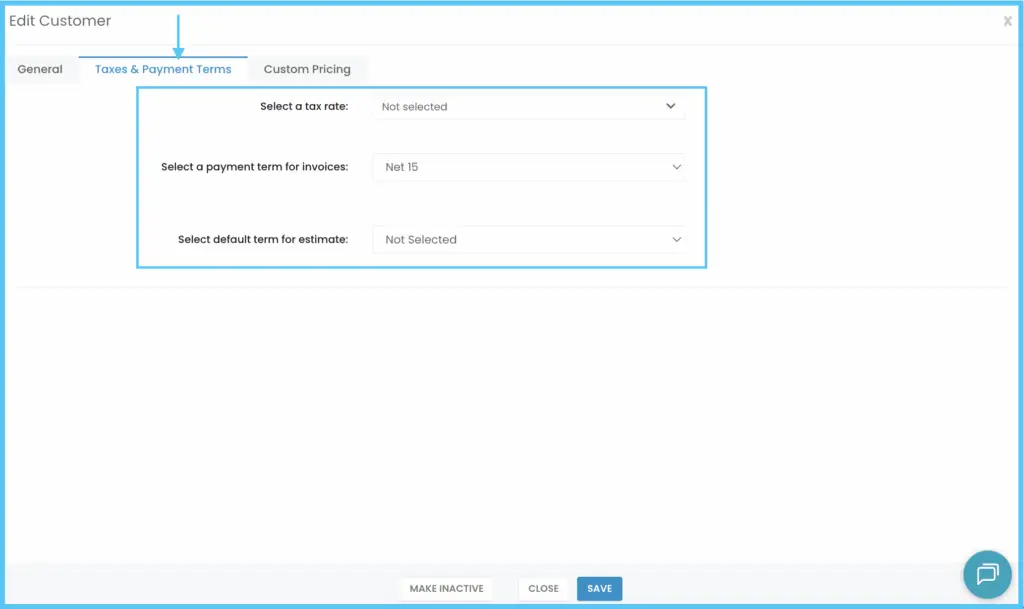
On the Tax & Payment Terms tab, choose:
- Tax Rate.
- Payment Terms for Invoices: when payment is due on invoices.
- Default Term for Estimate: when payment is due for estimates.
-
Click Save. The button stays greyed out until every required field is filled in.
Watch: Saving the new customer
The customer is added to your customer list. Open their profile to add more, such as extra locations, notes and files. See What's in a customer profile? (jobs, estimates, invoices, equipment, contracts, notes, files)
Edit a customer
-
Go to the Customer module.
-
Click the customer's name to open their profile.
-
Click Edit Contact in the upper-right corner.
-
Make your changes on the General and Tax & Payment Terms tabs.
-
Click Save.
Watch: Opening a customer's profile and editing it
If you changed the billing or service address, you'll see: "This change will update all estimates, jobs, and invoices created for this customer. Do you want to proceed?" Click Yes to update the address everywhere, or Cancel to save nothing. Check the new address first, especially if past records should keep the old one.
Make a customer inactive, active again, or delete them
Make inactive: open the profile, click Make Inactive (bottom-left), then Yes. The customer moves to the Inactive Customers list. To do several at once, select them in the list and use More Actions›Make Inactive.
Make active again:
-
Click More Actions›Show Inactive Customers.
-
Open the customer's profile and click Edit Contact.
-
Click Make Active, then Yes. The customer moves back to the active list.
Watch: Making an inactive customer active again
Delete (cannot be undone): you must make the customer inactive first.
-
Click More Actions›Show Inactive Customers.
-
Check the box beside each customer to delete.
-
Click Actions›Delete, then Yes.
Watch: Deleting an inactive customer
The customer list
The Active Customers list shows your active customers. Columns:
| Column | Shows |
|---|---|
| Number | Customer ID |
| Company | Business name |
| First / Last | Contact person's name |
| Location | Main service address |
| Phone | Work phone |
| Mobile | Cell phone |
| Email address | |
| Contracts | Agreements or memberships |
| Tags | Labels for grouping customers |
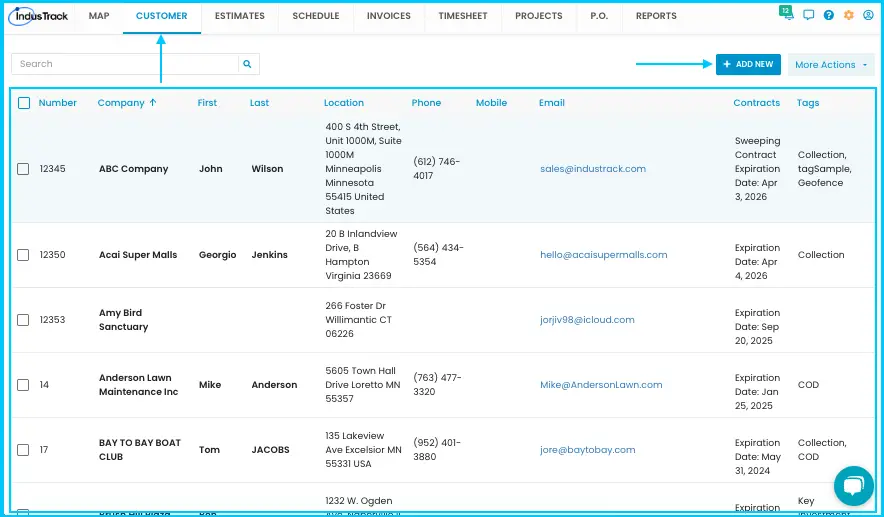
Search by customer ID, company name, contact name or location. Click a name to open the profile.
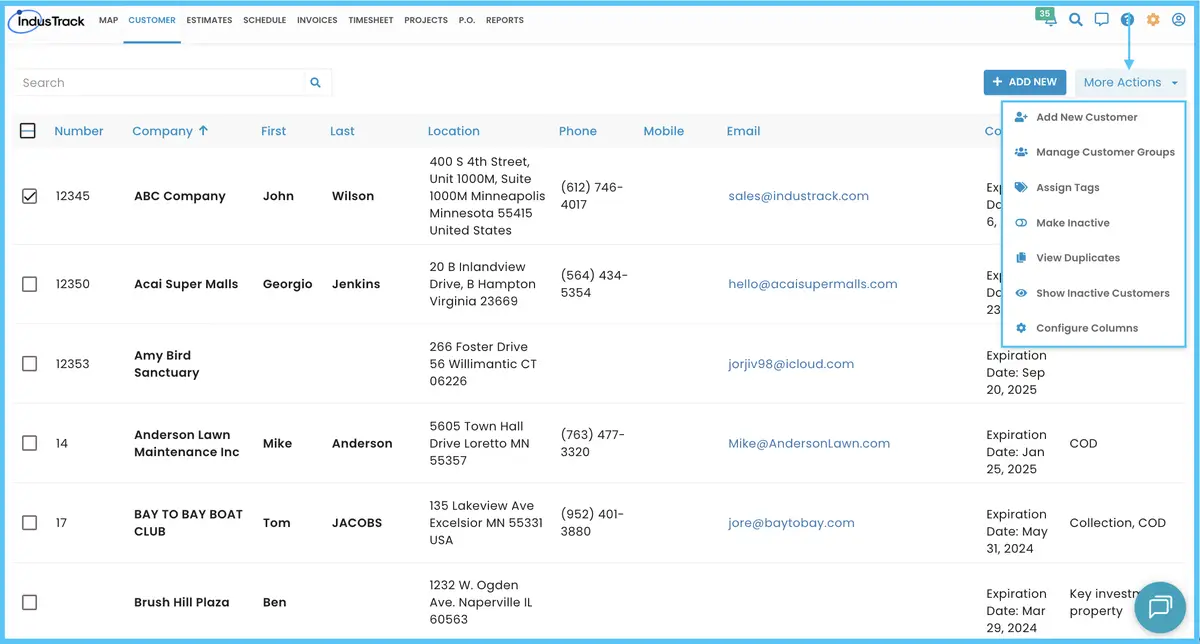
The More Actions menu has:
| Option | What it does |
|---|---|
| Add New Customer | Create a customer. |
| Manage Customer Groups | See, add (Add New), edit (three dots) or delete (check the box, click Delete) customer groups. Groups are used with the SnowTrack module: assign a group to each field employee, and they only see that group's customers in the SnowTrack mobile app. |
| Assign Tags | Add tags to several customers at once. |
| Make Inactive | Move selected customers to the inactive list. |
| View Duplicates | List possible duplicate profiles. From here you can View a profile or Make Inactive a duplicate. |
| Show Inactive Customers | Switch to the inactive list. Choose Active Customers to switch back. |
| Configure Columns | Check or uncheck columns to show or hide them, then click SAVE. |
Common questions
I got a "Possible Duplicate Customer" warning. What should I do?
A customer with the same Company Name already exists. Click Yes to add the new customer anyway, or No to go back and check the existing record.
When I send an invoice or estimate, which emails can I choose?
All emails saved on the customer appear as options, and you pick which ones to send to.
What is the service address used for?
Field employees see it in the IndusTrack mobile app for scheduled jobs. It isn't used to create a geofence automatically. You create geofences by hand on the Geofences tab of the customer's profile, where you can also edit or delete them. See How do I set up a geofence for a customer?
How do I add a second service location?
Add it from the Location tab of the customer's profile. See How do I manage a customer's service locations?
Can I edit an estimate or invoice for an inactive customer?
Yes. You'll see a warning first. Click Yes to save the change, or No to leave it unchanged.
The Customer module is greyed out. Why?
You don't have access to it. Ask your admin.
Was this article helpful?
Contact support